Importing a Figma Design into Flowmo: A Step-by-Step Guide #
In this step by step tutorial, we’ll guide you through seamlessly importing your Figma designs into Flowmo. We’ll cover everything from pre-import preparation to fixing common issues and adding interactive elements. Let’s get started!
Prerequisites #
Before diving into the import process, there are a few essential things to consider:
Web Fonts: #
Figma allows using any font, but since Flowmo creates websites, it requires the font to be accessible to any user visiting the website, usually web fonts also require a different licensed, use Flowmo’s library (including Google Fonts) or import your own.
Transparent Objects: #
- Figma struggles with exporting completely transparent objects with no storke and no fill at all, even if you would try to export these objects to SVG, an error message will appear.
- Before importing, either add a fill/stroke to them or delete them entirely
Installing Fonts in Flowmo #
Install Fonts in Flowmo: #
- Open your Flowmo project.
- Navigate to Settings > Web Fonts.
- Click the “+” button to upload your font file.
- Flowmo will auto-populate the font name and usually the font weight, if not, fill it.
- Click “Add Font”.
- Repeat for all required fonts.
Important: If the font weight is included in the font family name, remove it and select the correct weight from the “Weights” menu in Flowmo.
Importing from Figma #
Figma to Flowmo plugin #
- Use the Flowmo Plugin:
- In your Figma design, navigate to Resources Page > Plugins tab.
- Search for “Flowmo” and click on the first result to install the plugin.
- Prepare for Import:
- Run the Flowmo plugin.
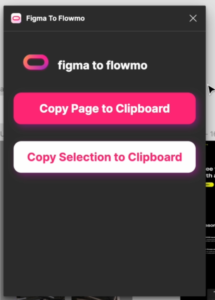
- Copy Your Design:
- Full Page: Click the “Copy the full page to the clipboard” button in the Flowmo plugin panel.
- Selection: Select the specific breakpoint (e.g., mobile) you want to import and click the “Copy the selection to the clipboard” button.
- Paste into Flowmo:
- In your Flowmo project, either:
- Use the keyboard shortcut (Cmd/Ctrl + V) to paste.
- Right-click and select “Paste from Figma”.
- In your Flowmo project, either:
- Repeat for Each Breakpoint:
- Repeat steps 3 and 4 for all desired breakpoints in your design (e.g., tablet, desktop).

Important: If the plugin shows a warning message, follow the instructions ion screen, click the “select” button, then you will need to resolve the issues by either removing the selected elements or by adding a fill or stroke to the.
Fixing Common Import Issues #
Unwanted Strokes: #
- Select all elements with the unwanted stroke.
- Go to the right panel and toggle the “Stroke” option off and on again.
Incorrect Gradients: #
- Select the element with the incorrect gradient.
- In the right panel, locate the “Background” section and adjust the gradient settings to match your Figma design.
Cut-off Icons/Graphics: #
- Check if the parent frame of the cut-off element has a “Clip-path” applied.
- If yes, uncheck the “Clip-path” option in the right panel.
Misaligned or Distorted Icons: #
- Re-import the problematic icon from Figma:
- Right-click the icon in Figma.
- Select “Copy as SVG” or “Copy as PNG”.
- Paste it directly into your Flowmo project.
Setting Up Responsive Design #
- Enable Adaptive Design:
- Select the imported breakpoint in Flowmo.
- In the right panel, go to the “Properties” tab.
- Click the “Adaptive Design” button.
- Repeat for each breakpoint.
- Connect Breakpoints:
- Stay in the “Properties” tab.
- Click “Connect as a breakpoint”.
- Select the corresponding breakpoint to connect to.
- Fine-tune Breakpoint Ranges (Pro Feature):
- Activate “Pro Options” from the top bar.
- Select the desired breakpoint.
- In the right panel, define the minimum and maximum widths for the breakpoint to be active.
Adding Interactivity: Slider Example #
- Select Element:
- Select the parent element of your future slides, this element needs automatic layout.
- Add Slider Interaction:
- Go to the “Interact” tab in the right panel.
- Click the “+” button.
- Under “Trigger”, select “Slider”.
- Customize Slider:
- Center Slides: Toggle on for centered slides.
- Slides Preview: Adjust the number of slides visible at once.
- Loop: Enable for continuous looping.
- Repeat for Multiple Sliders:
- Repeat the above steps for any additional sliders in your design.
Conclusion #
Congratulations! You’ve successfully imported your Figma design into Flowmo. Remember to explore Flowmo’s features further to fine-tune your website’s responsiveness, interactivity, and overall design.
For additional guidance, visit our community website or contact us via [email protected] or our help widget.


